Wednesday, 22 January 2014

Felted Wall-Hanging inspired by Monet's Waterlily Paintings- a fantastic School Project

This impressive felted wall hanging was made in a day by 24  four and five year olds (120cm W,  85cm H)
It’s great that I love working with children! 
One of my fun days last summer was working with 24 Reception/Year 1 children at Beech Street Primary School in Eccles (on the outskirts of Manchester). 

Teacher and School Arts Week Co-ordinator, Gill Douglas, contacted me and asked if I could help and of course I said yes! 

We decided that the children would make a wall hanging inspired by Monet’s waterlily paintings. 

Working in schools is interesting as there is always so much going on but often the logistics of fitting in and around things (like pirate parties and PE lessons) can be a challenge. Luckily for me Gill had left me with some fantastic staff who helped me to sort the children into smaller groups and to work out timings for bite sized chunks of felting throughout the day.

Working with six children at a time I gave them a simple introduction to Claude Monet. I had taken a selection of library books and had also printed off some relevant pictures. Even though the children were aged just 4 and 5 I really wanted to give them some interesting information and images of Monet. 

Well Monet had a BIG beard and he had a BIG garden! 


and he painted big paintings too!

Although I had photos of waterlilies I would really have loved to have been able to take a real waterlily flower into the classroom!


I explained that Monet was an artist who made his pictures with paint but we were going to make our wall hanging using colourful wool fibres. 
At this point it is always better to just get started with the physical act of felting. 

I had separated the wool fibres into greens for the waterlily leaves and pinks and purples for the flowers, so with each group we either made flowers or leaves. 
Wool fibres laid in a swirl; a simple way to make felted waterlily flowers
Softly felted waterlily flowers made by the children
We made lots of these flowers and leaves and laid them out ready for the afternoon. 


At lunchtime I got the classroom ready for making the big wall hanging so that as soon as my first group came back from their pirate party they were ready to go! I definitely wanted to make sure that every single child had taken part in every stage of the process.

Once the table was covered in a layer of white wool fibres we then changed to a pallet of blues and purples. This was fun as the children really do enjoy breaking the wool into small tufts. (This part of the felting process is called ‘laying-out’) and they were pretty impressed that we were working on such a large scale.


We used a range of blue coloured fibres to lay over the white layer (these were laid at right angles to the white layer). Now we had a ‘pond’ and next we had to decide where all of the waterlily flowers and leaves had to go. I showed the children Monet's waterlily paintings again as I felt it was important to remind them of what we were doing. The felting can all get a bit exciting  and I just wanted to remind them of the ‘big picture’ ie our Arts Week project.

One of Claude Monet's waterlily paintings
Again I feel that it is very important for the children to take ownership of their own art so I let them place the felted flowers and leaves on and then together we adjusted the position of some until we were happy with the composition. At this point I was really pleased that the teaching assistants felt happy to tell me their observations and they helped with the composition too.
Next I stood up on a chair and looked down at it to give the design a final check.

Once happy with this we got onto the big job of wetting, soaping, rubbing and rolling.
The laid out design completely wet and soaped with Olivia olive oil soap
Logistically this is the hardest bit of making a large collaborative piece of felt as there just isn’t space for 24 children to roll at once. 
Miss Morris, my fantastic teaching assistant, came to the rescue; as the children took turns with the rolling she and the rest of the children launched into a cavalcade of songs. They were absolutely fantastic and the singing made the rolling all so much easier and lots of fun, especially for me!

Rolling the wet and soaped design up in a bamboo mat
We stopped and admired our felt. Wow! There was no denying it, it was pretty impressive and all made by 24 children aged just 4 and 5.
Finished felted wall hanging (120cm W, 85cm H)
It is still damp here so would look even better once dry.
Before I left Beech Street school I hand-sewed a strip of cotton fabric onto the back of the top edge of the wall hanging. Then I threaded a length of dowelling through it and left it with two hooks ready for the school's brilliantly helpful janitor to hang up once it was dry.  

And finally how lovely to get this e mail from Gill Douglas, the School Arts Week Co-ordinator. 

"The work produced is fantastic and the wall hanging has already gone up! 
Thank you for your wonderful work & enthusiasm - everyone had a great, productive time!"


Friday, 19 July 2013

Wonderful Paul Klee inspired Felted Portraits by year 4 students


Felted portraits made by pupils in year 4 (8 and 9 year olds). Paul Klee was their inspiration.

‘Taking a line for a walk’ is an expression that everyone who has ever attended a college art class has heard, but up until recently I had no idea that it was Paul Klee who first coined the phrase.

One thing about doing activities for schools’ Arts Weeks is that you get the chance to do projects on new themes and also take inspiration from artists that you haven’t used before. I was delighted to be asked by Beech Street school, Eccles near Manchester, to run a day long session on Paul Klee for their year 4 pupils.

Paul Klee’s work is hard to categorise as his style was very broad ranging. My friend instantly thought of his goldfish painting but I was reminded of the postcard that I had on my wall a long time ago when I was a student up in Edinburgh. I actually saw the original painting in the flesh very recently too (see below).


Original painting by Paul Klee. In the Peggy Guggenheim museum, Venice.

So I decided to use Paul Klee’s portraits as the starting point for my felting workshop with the Year 4 pupils.

We started the day by talking about what we knew about Paul Klee; for example I told the children that he was a talented violinist and that throughout his life he still listened to music for at least an hour before starting to paint each day. We mentioned his illness and how that affected his paintings in later life - paintings towards the end of his life are done using darker colours and also have thicker dark lines in them - and we even managed to mention how much he loved cats.

I had taken various illustrated library books and these along with images sourced from the internet were helpful in giving the children an introduction to the artist.

We closed our eyes and did some taking a line for a walk exercises. At this point I wished that I had taken some atmospheric music with me to play as Paul Klee’s paintings were very influenced by his own emotions and music is a very useful way to arouse emotions in these sorts of drawing sessions.

The children did four ‘taking a line for a walk’ exercises and it was good to see how each person’s evolved as they became more relaxed and realised that there was no right answer. All that I asked was that they didn’t lift their pen from the page until we opened our eyes.

We did consider the shapes that the pen was making; spikey or smooth, looping or wavy, and as the children had their eyes closed they had to feel these movements rather than see them. 

I was happy for the children to use two pens at once, either in the same hand or one in each hand. It's always good fun!
Next we progressed onto laying out the wool fibres. I did a short demonstration to show them how to handle the merino wool fibres and we all laid out our first layer of unbleached wool tops. Then I demonstrated two methods of ‘drawing’ with wool fibres; one that was more suited to this portrait style (see below).


Paul Klee portrait alongside my felted example.

and another method that was appropriate to this portrait style.

Paul Klee painting alongside one of the pupil's designs. 

Dry wool fibres laid out before wetting.

In the afternoon the classroom was absolutely buzzing with activity and it was exciting to see how the pupils took what they had learned in the morning and absolutely ran with it. 

I had taken a limited pallet of colours, yellows, oranges, deep red, russet and a couple of greens. These had been selected as the majority of the portraits by Paul Klee were painted using these colours. The good thing about using a limited pallet of colours is that it avoided the felted portraits becoming completely multi-coloured and helped us to remember that we were thinking about the lines that we were making and also that this was about using felting as a medium but the work that we were making was still inspired by Paul Klee.

Each felted portrait is unique and not just felted but felted to a good standard. 

I love this one for the energy and personality that it manages to convey
This minimalist one uses no lines at all! 

And in this one there are more lines than facial features

I can feel Paul Klee's anger as he suffered from a very painful illness here. 

I was really fantastically impressed and pleased with the children’s achievements and it was brilliant as a visiting artist to get such enthusiastic comments and feedback from them all.
“This was our best day!”
“I love doing this!”
“When can we do it again?” 


The day went so well because all of the children were enjoying the variety of the activities in their School Arts Week and also because I had excellent support from the class teacher Miss Orr, teaching assistants and parent helpers. 

And a Janitor who helps you in with all your felting materials and equipment is always a hero!


Tuesday, 23 April 2013

Ceramic and Textile Carousel for Derbyshire Schools Library Service


Primary school pupils adding their own handmade cups to the carousel made by Kirsty E Smith and Wendy Johnson
I was recently invited to contribute to a really interesting project in Derbyshire. There were plenty of reasons why this project was right up my street. Firstly I got see behind the scenes of the Derbyshire Schools Library Service Collection (more about this later), secondly I was working with five other creatives including visual artists, musicians and a poet (a nice change from working alone!) Thirdly it included two busy days of working with lots (240) school children and lastly it culminated in an exhibition and workshops which took place in a very unique building; a octagonal gallery space within a school built in 1914.
The King George Gallery a unique space within The Ilkeston and Ormiston Academy, Derbyshire.
This was an outreach project where I could draw both from my own practice www.frillipmoolog.co.uk and also my experience in facilitating fun and interesting creative workshops www.allsensesart.com

We started the project, called ‘Dear SLS’, with a visit to the Derbyshire and Derby Schools Library Service Collection and what a special place it is; the building itself was inspirational. 


Vaulted ceiling of the Derbyshire and Derby Schools Library Collection
Rather than being a library of books this collection is a library of objects, artifacts from around the world, prints of well known artworks, original paintings and also a good collection of textile art - stitched fabric collages from the 70’s in particular. 
Stitched fabric collages; these were especially popular in the1970's
The aim of Dear SLS was to help publicise the service and encourage more schools, artists and individuals to make use of this unusual object lending service. People will always have a stronger understanding of and connection with something that they have actually held in their hands rather than just seen an image of on paper or on screen. Pixels can’t match the real thing!

Dear SLS also helped some year 10 students gain their Silver Arts Award; they selected objects from the collection and curated their own exhibition with these objects. Ceramic artist, Wendy Johnson, and I looked at the items that Tim Berry had selected for his Fairground inspired exhibition (some gorgeous stuff that it was very easy to be inspired by) 


Colourful and bold illustrations in a children's book, Night at the Fair.
Detail from a well known Barbara Jones lithograph (1945)
and also the objects that had been selected by the students working with the theme of People and Places. There was an eclectic range of items including a Norwegian terra cotta cup, a Japanese tea ceremony set, some Polynesian Tapa cloth made from tree bark and a pair of dainty little embroidered silk shoes.

Wendy and I decided to work together to make our own contribution; a carousel which would be part ceramic and part wood, wire and textiles. This is the first collaborative piece that I have made and although not actually a Frillip Moolog sculpture I did use techniques that I have used in previous Frillip Moolog beings.
Me (Kirsty E Smith) with student Tim Berry and ceramic artist Wendy Johnson (right)
The primary school pupils who visited the exhibition completed our carousel by making and decorating their own paper cups which were then hung within the carousel. 

I designed a template for the cups and then printed it directly onto coloured card. The pupils decorated, cut out and  assembled their own cups.
Cups seemed the obvious connection between the cups in the People and Places exhibition and the tea cup roundabouts that are a longstanding favourite fairground ride with very young children. 

Terracotta cup from the Norwegian collection within the Schools Library Service and fairground teacup ride 
Despite having to work very quickly the students really rose to the challenge, they took inspiration from various patterns and decorative motifs within the exhibition. 

Motif copied from a hand painted African wallhanging and stylised eyes inspired by those of an Indonesian carved goddess (both items included in the People and Places part of the exhibition). 
Looking up inside the carousel canopy is one of favourite views
The other participating artists having a musical relax within the gallery space at the end of a busy day. 
Other artists contributing to Dear SLS: 


If you are interested in visiting the Dear SLS exhibition in The King George Gallery, The Ilkeston and Ormiston Academy then contact Kate Le Provost Community and Arts Development Officer on 0115 9948635
for opening times. 


Tuesday, 20 November 2012

Roomy and Stylish Felted Handbags that you'll use every day!

Bryony models one of my spotty big bags- notice the mauve colour that I used for the inside.
I have often seen bag making felting workshops advertised but when I have checked the dimensions of the bag I have realised that it is a very small bag; and even some felting kits that are available online are for tiny bags, the kind of bag that I call a ‘wedding handbag’. 
So I decided that if I was going to run hand felted bag making workshops it would be to make a practical and roomy handbag; the type of bag that I would like to use everyday. 

I made my first All SensesArt 'big bag’ back in Summer of 2011 and I have been using it everyday since. Over the months it seems to have softened and moulded to my body shape...a bit like an old Harris Tweed jacket, so it has actually improved with age!

I have run several day long AllSensesArt Felted Big Bag workshops since making my own so I thought it was time to share some of my creative process. 

This is how much it will shrink in size!
I used a favourite bag as a guide for the shape and proportions that I wanted my bag to be. From experience I know how much shrinkage to expect so I scaled my outline up and then cut a template from plastic. I like to use the builders' roofing plastic that is easily available (and very cheap) from builders merchants like Wickes and B&Q.
Laying out the wool takes time but is worth the effort.
To get a good finish and to help reduce the chances of the surface of the finished bag pilling I laid out twelve very thin layers of wool fibres (six layers on either side of the plastic). 
This is much better than laying out fewer thick layers.
I love Cate's choice of rich colours and flamboyant design. 
Even in a day long workshop there isn’t really lots of time to lay out a very complex  design. At the beginning of the session we make our own two sided pre-felt i.e. with two different colours of wool fibres so that it can be used either way up. I often keep my decoration simple by cutting circles, but simple flower shapes, leaf shapes and other geometric shapes are all possible.
Extra decoration can be added using whisps of other coloured wool tops or fluffy knitting yarns such as mohair. 

Cate. These projects can seem enormous at this point!
As we are working on a large scale I have kept the size of workshops quite small- with just four participants per workshop. This means that everyone can have a table to themselves and also that there is enough room when we need access to the kitchen sinks (the hall that I have used has two stainless steel sinks which is great). 
Cutting open to remove the template and further work the handle strap.
It is always an exciting moment when the fibres are felted together enough to cut the template out. But not the time to get too relaxed as there is still quite a bit of felting to be done to further shrink the bag! 
Getting smaller but not quite there yet.
Trish with her finished bag.  For her design she needs to sew on her orange and red felted handles.
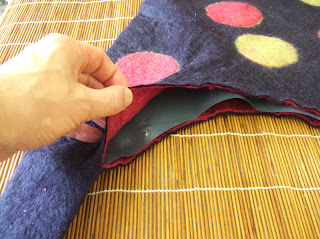
Some people like to add a magnetic closure but I have opted to sew a gusset of heavy duty satin lining in with a zip closure. I really like this as it isn’t visible from outside, doesn’t spoil the way that the bag hangs and makes sure that everything is secure inside. 

Cate's completed bag; it is fantastic!
If you would like to make your own felted big bag with me then just get together a group of friends or work colleagues and I can run a full day workshop for you. I need just four people to be able to run these full day classes for only £69 per person. These classes are usually held at Martin Heath Hall, Christchurch Lane, Lichfield, Staffordshire. WS13 8AY but if you prefer I can come to a venue of your choice. 

Cost: £69 (this includes all wool fibres, use of equipment and tea coffee and biscuits).